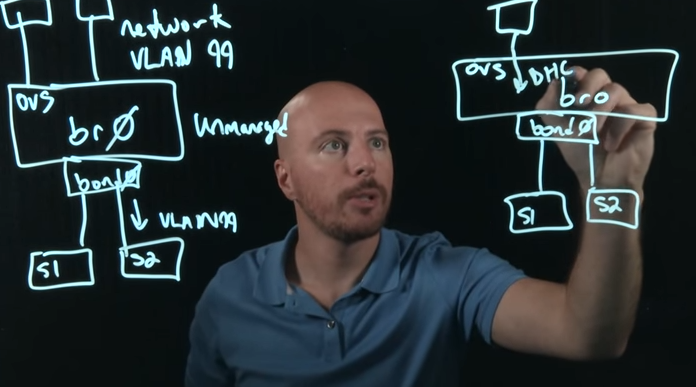
Part 4 – User Virtual Machine VLANs and Networking (You are here!)
We’re wrapping up our four part series on Nutanix AHV networking today with a look at the User VM Networking. Check out the Nutanix Connect Blog for full details.
We cover the difference between managed and unmanaged networks for VMs. VM networks can be rapidly created through the Prism GUI, the Acropolis CLI, or the REST API.
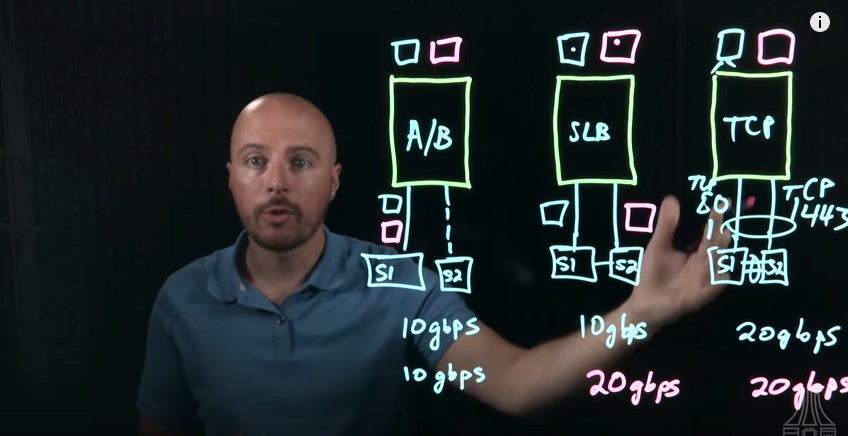
In our last post we explored bridges and bonds with AHV and Open vSwitch. Today on the Nutanix .NEXT Community Blog I’m covering load balancing within a bond to get maximum throughput from our hypervisor host!
I’m happy to announce the release of the first Light Board Videos I recorded with the Nutanix nu.school education team. These videos were a blast to record. The education team here at Nutanix is top notch and made my scribbles and rambling look and sound great! A video production team is an amazing asset to have sitting behind you in the office!
AHV provides an alternative to traditional hypervisors – and with that alternative comes a new virtual switch! This virtual switch bridges the VMs to the physical network.
To find more information about the video, including all of the rationale behind the decisions made – check out the Nutanix .NEXT Community blog I wrote describing AHV Host Networking.
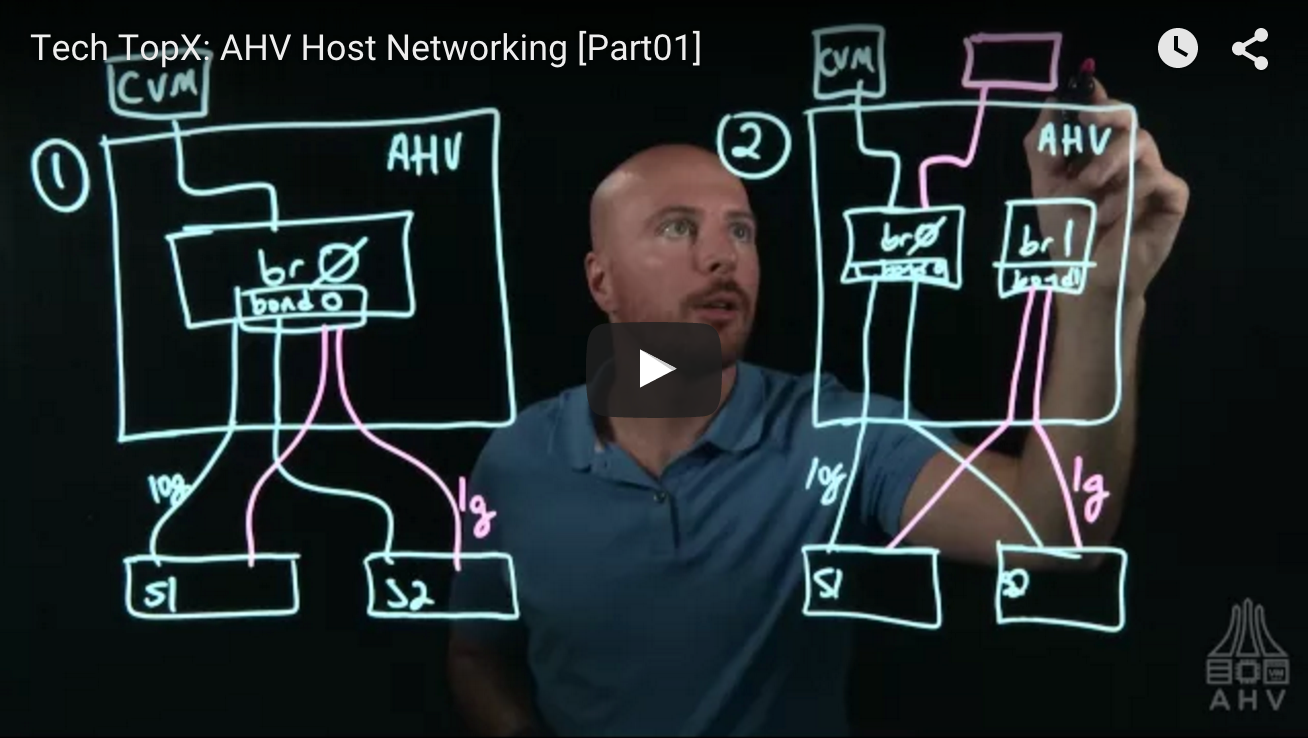
Here’s the embedded first part of the video. I talk about Open vSwitch bridges and bonds, and how to connect the CVM and the User Virtual Machines to the 10gb or 1gb network interfaces. Follow the Nutanix .NEXT community blog, my site here, or the nu.school YouTube page to watch the rest of the series.
We’ll cover Load Balancing, Managed and Unmanaged VM networks, and more in the coming weeks!
Nutanix  introduced the concept of AHV, based on the open source Linux KVM hypervisor. A new Nutanix node comes installed with AHV by default with no additional licensing required. It’s a full-featured virtualization solution that is ready to run VMs right out of the box. ESXi and Hyper-V are still great on Nutanix, but AHV should be seriously considered because it has a lot to offer, with all of KVMs rough edges rounded off.
Part of introducing a new hypervisor is describing all of the features, and then recommending some best practices for those features. In this blog post I wanted to give you a taste of the doc with some choice snippets to show you what this Best Practice Guide and AHV are all about.
Take a look at Magnus Andersson’s excellent blog post on terminology for some more detailed background on terms.
Acropolis Overview
Acropolis (one word) is the name of the overall project encompassing multiple hypervisors, the distributed storage fabric, and the app mobility fabric. The goal of the Acropolis project is to provide seamless invisible infrastructure whether your VMs exist in AWS, Hyper-V, ESXi, or the AHV. The sister project, Prism, provides the user interface to manage via GUI, CLI, or REST API.
AHV Overview
AHV is based on the open source KVM hypervisor, but is enhanced by all the other components of the Acropolis project. Conceptually, AHV has access to the Distributed Storage Fabric for storage, and the App Mobility Fabric powers the management plane for VM operations like scheduling, high availability, and live migration.
The same familiar Nutanix architecture exists, with a network of Controller Virtual Machines providing storage access to VMs. The CVM takes direct control of the underlying disks (SSD and HDD) with PCIÂ passthrough, and exposes these disks to AHV via iSCSI (The blue dotted VM I/O line). The management layer is spread across all Nutanix nodes in the CVMs using the same web-scale principles of the storage layer. This means that by-default, a highly available VM management layer exists. No single point of failure anymore! No additional work to setup VM management redundancy – it just works that way.
AHV Networking Overview
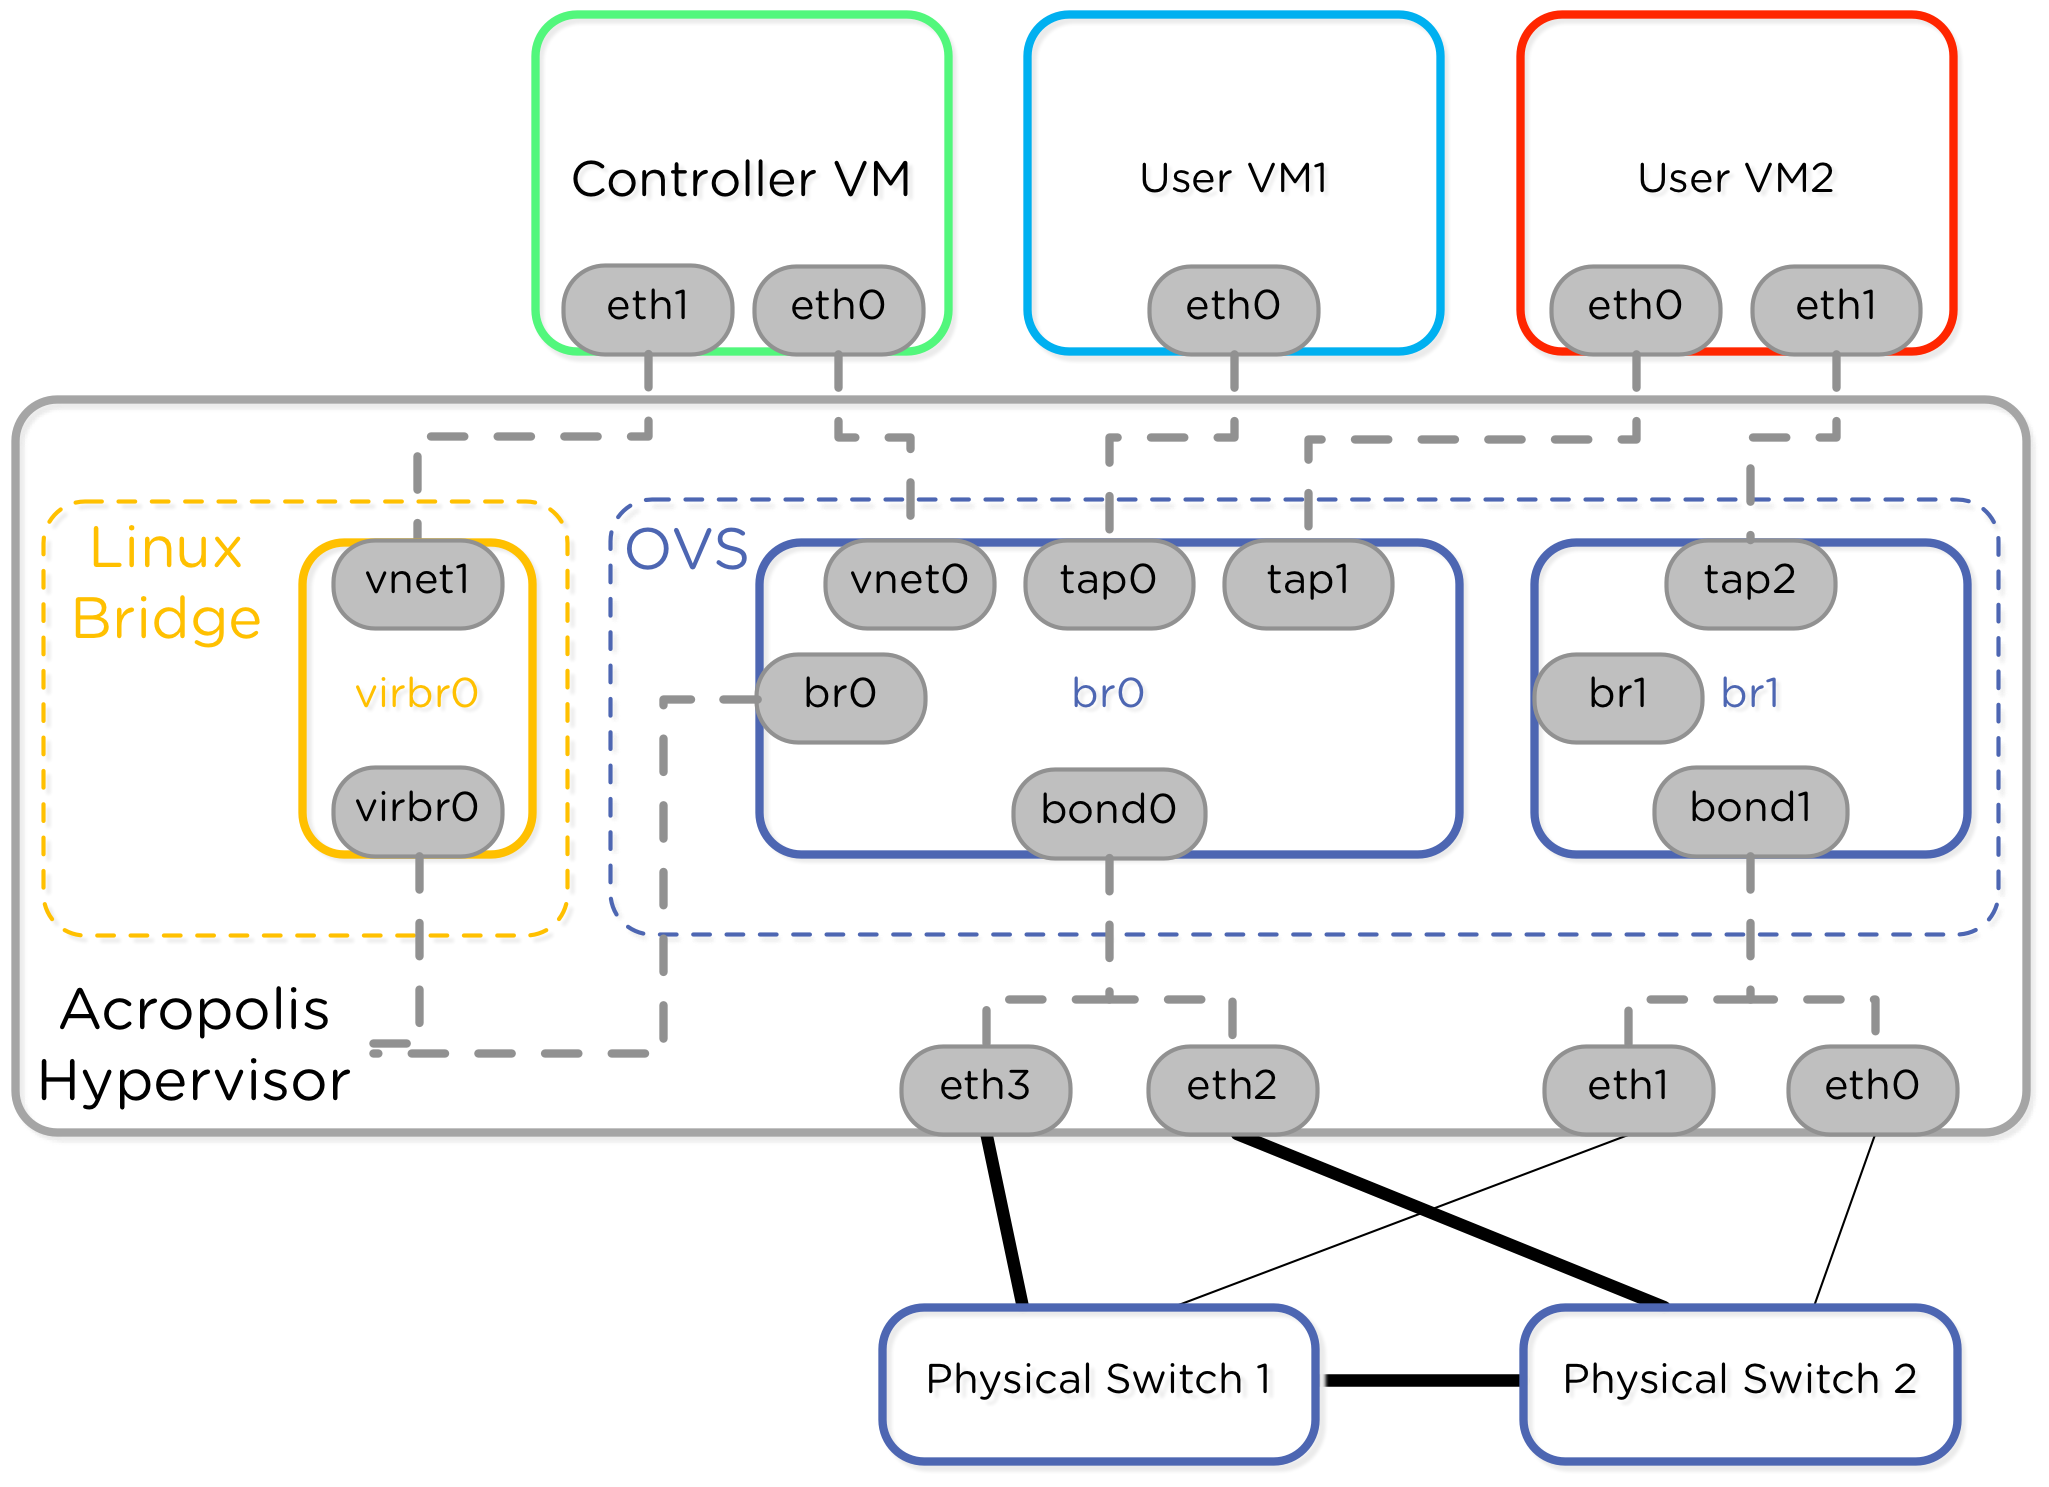
Networking in AHV is provided by an Open vSwitch instance (OVS) running on each AHV host. The BPG doc has a comprehensive overview of the different components inside OVS and how they’re used. I’ll share a teaser diagram of the default network config after installation in a single AHV node.
AHV Networking Best Practices
Bridges, Bonds, and Ports – oh my. What you really want to know is “How do I plug this thing into my switches, setup my VLANs, and get the best possible load balancing. You’re in luck, because the Best Practice Guide covers the most common scenarios for creating different virtual switches and configuring load balancing.
Here’s a closer look at one possible networking configuration, where the 10gigabit adapters and 1gigabit adapters have been connected into separate OVS bridges. User VM2 has the ability to connect to multiple physically separate networks with this design to allow things like virtual firewalls.
After separating network traffic, the next thing is load balancing. Here’s a look at another possible load balancing method called active-slb. Not only does the BPG provide the configuration for this, but also the rationale. Maybe fault tolerance is important to you. Maybe active-active configuration with LACP is important. The BPG will cover the config and the best way to achieve your goals.
For information on VLAN configuration, check out the Best Practices Guide.
Other AHV Best Practices
This BPG isn’t just networking specific. The standard features you expect from a hypervisor are all covered.
VM Deployment
Leverage the fantastic aCLI, GUI, or REST API to deploy or clone VMs.
VM Data Protection
Backup up VMs with local or remote snapshots.
VM High Availability
During physical host failure, ensure that VMs are started elsewhere in the cluster.
Live Migration
Move running VMs around in the cluster.
CPU, Memory, and Disk Configuration
Add the right resources to machines as needed.
Resource Oversubscription
Rules for fitting the most VMs onto a running cluster for max efficiency.
Take a look at the AHV Best Practice Guide for information on all of these features and more. With this BPG in hand you can be up and running with AHV in your datacenter and get the most out of all the new features Nutanix has added.
Nutanix recently released the AHV hypervisor, which means I get a new piece of technology to learn! Before I started this blog post I had no idea how Open vSwitch worked or what KVM and QEMU were all about.
Since I come from a networking background originally, I drilled down into the Open vSwitch and KVM portion of the Nutanix solution. Here’s what I learned! Remember my disclaimer – I didn’t know anything about this before I started the blog. If I’ve got something a bit wrong feel free to comment and I’m happy to update or correct.
KVM Host Configuration
AHV is built on the Linux KVM hypervisor so I figured that’s a great place to start. I read the Nutanix Bible by Steve Poitras and saw this diagram on networking.
AHV OvS Networking
The CVM has two interfaces connecting to the hypervisor. One interface plugs into the Open vSwitch and the other goes to “internal”. I wasn’t sure what that meant. Looking through the hypervisor host config though I saw the following interfaces:
[root@DRM-3060-G4-1-1 ~]# ifconfig
br0 Link encap:Ethernet HWaddr 0C:C4:7A:58:91:50
inet addr:10.59.31.77 Bcast:10.59.31.255 Mask:255.255.254.0
eth0 Link encap:Ethernet HWaddr 0C:C4:7A:3B:1C:8C
eth1 Link encap:Ethernet HWaddr 0C:C4:7A:3B:1C:8D
eth2 Link encap:Ethernet HWaddr 0C:C4:7A:58:91:50
eth2.32 Link encap:Ethernet HWaddr 0C:C4:7A:58:91:50
eth3 Link encap:Ethernet HWaddr 0C:C4:7A:58:91:51
eth3.32 Link encap:Ethernet HWaddr 0C:C4:7A:58:91:51
lo Link encap:Local Loopback
virbr0 Link encap:Ethernet HWaddr 52:54:00:74:F9:B0
inet addr:192.168.5.1 Bcast:192.168.5.255 Mask:255.255.255.0
vnet0 Link encap:Ethernet HWaddr FE:54:00:9C:D8:CD
vnet1 Link encap:Ethernet HWaddr FE:54:00:BE:99:B3
The next place I went was routing with netstat -r to see which interfaces were used for each next hop destination.
[root@DRM-3060-G4-1-1 ~]# netstat -r
Kernel IP routing table
Destination Gateway Genmask Flags MSS Window irtt Iface
192.168.5.0 * 255.255.255.0 U 0 0 0 virbr0
10.59.30.0 * 255.255.254.0 U 0 0 0 br0
link-local * 255.255.0.0 U 0 0 0 eth0
link-local * 255.255.0.0 U 0 0 0 eth1
link-local * 255.255.0.0 U 0 0 0 eth2
link-local * 255.255.0.0 U 0 0 0 eth3
link-local * 255.255.0.0 U 0 0 0 br0
default 10.59.30.1 0.0.0.0 UG 0 0 0 br0
I omitted a lot of text just to be concise here. We can see there are two interfaces with IPs, br0 and virbr0. Let’s start with virbr0, which is that internal interface. You can tell because it’s the 192.168 private IP used for CVM to hypervisor communication. I found that it was a local linux bridge, not an Open vSwitch controlled device:
[root@DRM-3060-G4-1-1 ~]# brctl show virbr0
bridge name bridge id STP enabled interfaces
virbr0 8000.52540074f9b0 no virbr0-nic
vnet1
This bridge virbr0 has the vnet1 interface headed up to the internal adapter of the CVM – so THIS is where the CVM internal interface terminates.
That’s one side of the story – the next part is Open vSwitch
[root@DRM-3060-G4-1-1 ~]# ovs-vsctl show
be65c814-5d7c-46ab-bfb1-7b2bea19d954
Bridge "br0"
Port "tap345"
tag: 32
Interface "tap345"
Port "vnet0"
Interface "vnet0"
Port "br0"
Interface "br0"
type: internal
Port "bond0"
Interface "eth2"
Interface "eth3"
Port "br0-dhcp"
Interface "br0-dhcp"
type: vxlan
options: {key="1", remote_ip="10.59.30.82"}
Port "br0-arp"
Interface "br0-arp"
type: vxlan
options: {key="1", remote_ip="192.168.5.2"}
ovs_version: "2.1.3"
OvS has a vSwitch called br0. The CVM vnet0 is a port on this bridge, and so is bond0 (the combination of the 10GbE interfaces). We also see this special “type:internal” interface – this one with the IP address assigned to it. This is the external facing IP of the AHV / KVM hypervisor host.
In addition to the CVM, external, and internal interfaces we see a tap345 interface tagged in VLAN 32. This matches the tagged interfaces from our “ifconfig -a” command above: eth2.32 and eth3.32. It’ll be used for a VM that has a network interface in VLAN 32.
Finally – we come to the IP Address Management (IPAM) interfaces, br0-arp, and br-dhcp. Steve mentions VXLAN and here’s where we see those concepts. The OvS can either intercept and respond to DHCP traffic, or just let it through. If we allow OvS to intercept the traffic this means Acropolis and Prism now become the point of control for giving out IP addresses to VMs that boot up. Very cool!
Now let’s take a look at the config parameters passed to the running CVM. Right now this box has ONLY the CVM running on it so only one instance of qemu-kvm running.
We saw a new reference in that last command, NTNX-Local-Network. If we look at virsh for information about defined networks we see the following:
[root@DRM-3060-G4-1-1 ~]# virsh net-list --all
Name State Autostart Persistent
----------------------------------------------------------
NTNX-Local-Network active yes yes
VM-Network active yes yes
If we look in the /root/ partition there are definitions for these:
These two pieces of information tie everything together neatly for us. The internal network given to the CVM is the linux virbr0 device. The external network given to the CVM is OvS br0.
Now I think I finally understand that image presented at the beginning!
CVM Guest Configuration
Since we understand the KVM/AHV host configuration lets take a look in the CVM guest. This should be a little easier.
nutanix@NTNX-15SM60140129-A-CVM:10.59.30.77:~$ netstat -r
Kernel IP routing table
Destination Gateway Genmask Flags MSS Window irtt Iface
192.168.5.0 * 255.255.255.128 U 0 0 0 eth1
192.168.5.0 * 255.255.255.0 U 0 0 0 eth1
10.59.30.0 * 255.255.254.0 U 0 0 0 eth0
link-local * 255.255.0.0 U 0 0 0 eth0
link-local * 255.255.0.0 U 0 0 0 eth1
default 10.59.30.1 0.0.0.0 UG 0 0 0 eth0
The routing table shows the internal and external networks, and just two network adapters. The eth1 adapter has a subinterface. This one is eth1:1 as opposed to .1. Not entirely sure what that one means – but I’ll keep it in mind in case I come across something later on.
nutanix@NTNX-15SM60140129-A-CVM:10.59.30.77:~$ ifconfig -a
eth0 Link encap:Ethernet HWaddr 52:54:00:9C:D8:CD
inet addr:10.59.30.77 Bcast:10.59.31.255 Mask:255.255.254.0
eth1 Link encap:Ethernet HWaddr 52:54:00:BE:99:B3
inet addr:192.168.5.2 Bcast:192.168.5.127 Mask:255.255.255.128
eth1:1 Link encap:Ethernet HWaddr 52:54:00:BE:99:B3
inet addr:192.168.5.254 Bcast:192.168.5.255 Mask:255.255.255.0
UP BROADCAST RUNNING MULTICAST MTU:1500 Metric:1
lo Link encap:Local Loopback
inet addr:127.0.0.1 Mask:255.0.0.0
That’s it – just two simple interfaces in the CVM. One for internal traffic to the hypervisor directly, another for receiving any external requests from remote CVMs, the management APIs, and all of the other magic that the CVM performs!
This concludes our walkthrough of networking inside a Nutanix AHV machine. I hope you learned as much as I did going through these items! Please comment or reach out to me directly if you have any questions.