Nutanix and UC - Part 4: VM Placement and System Sizing


In the last blog post I talked about sizing individual VMs. Today we'll look at placing UC VMs onto a Nutanix node (an ESXi host) and coming up with overall system sizing.
First I'd like to announce the publication of my document for Virtualizing Cisco UC on Nutanix. Readers of the blog will recognize the content and the diagrams ;) I've combined all of this information for publication and delivery to customers and partners planning to deploy Cisco Unified Communications.
Next, let's look at placing Cisco UC VMs to size a Nutanix system. Once you have a count of all the VMs needed and their individual sizes you can spread them around on paper to see how much hardware rack and stack is in your future. With Nutanix you'll have a lot less work ahead of you than with any other solution! Use all the methods documented in the previous posts to size the individual VMs.
There are a few options for VM placement. I used Omnigraffle on my Mac to create diagrams like the one you see here, but Visio or MS Excel will work just as well. The "Hypervisor CPU Cores" represent the space available on a single Nutanix node. I didn't specify ESXi, Hyper-V, or KVM directly because Nutanix can support all three hypervisors.
In a Nutanix block you can have up to 4 nodes in a 2 RU device. Below we see a single 16 core node. New Nutanix models will be released in the future with different core counts, roughly keeping track with Intel's releases of new hardware. Size your core count based on what's available on the Nutanix hardware platform page.
EDIT on 2015-10-23 Nutanix switched to a "Configure To Order" model and now many more processor core options are available, from 2x8 core all the way up to 2x18 core. This provides a lot of flexibility for sizing UC solutions.
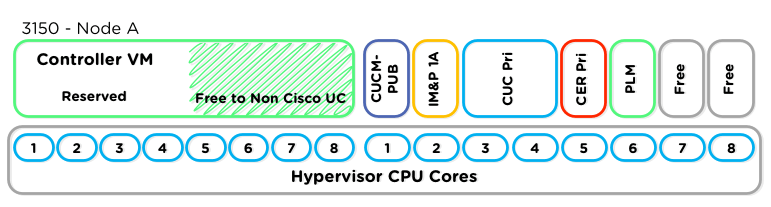
Take some space and reserve it for the Nutanix Controller Virtual Machine. Exactly how much space reserved really depends on the IO load expected. The CVM will reserve four vCPUs at a minimum. Looking at the CVM properties in vSphere you can see it actually has eight vCPUs provisioned which is why the shaded area exists. These four vCPUs that exist in a limbo state (provisioned but not reserved) can be used by any application that doesn't mind CPU oversubscription.
Unfortunately Cisco UC and most other UC applications don't allow oversubscription so we have to just chop off eight vCPUs right at the start to abide by Cisco's requirements. Don't worry though, four of these vCPUs are not lost entirely. Make good use of them by putting a DHCP server there, or DNS, or a Domain Controller. Put a Linux SFTP backup server there if you like for handling incoming application backups from Cisco UC. Mine bitcoins. These cores are yours, you have options!
If you know that a Nutanix node is going to push SERIOUS IO traffic because you've read the IOPS requirements and see that you'll need many many thousands of IOPS for the VMs, bump up the number of vCPUs that you leave for the Nutanix CVM. Under heavy load, the multi-threaded process will use all available vCPUs to handle IO requests. Under normal load the four reserved vCPUs will be plenty.
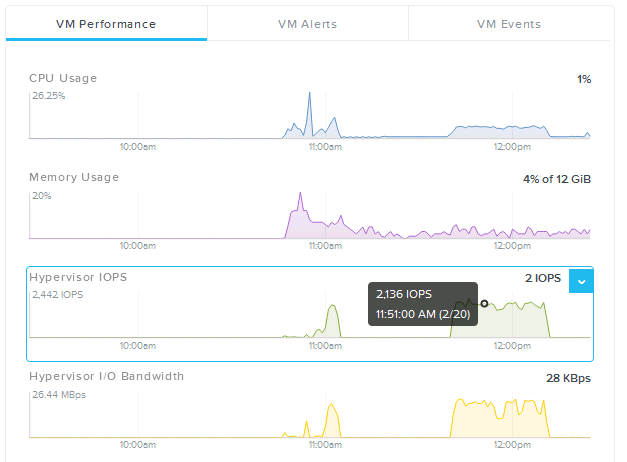
If you're unsure of the IO load a machine will generate, fear not! The Nutanix Prism interface shows detailed stats per virtual machine. You can get an idea of what a VM is doing just by watching the Prism page for that VM. Below we see a VM that exhibits a spike in IOPS over a period of time.
Along with Excel, Omnigraffle, and Visio, tools exist on the Cisco website to do VM placement. I like to use the UC Placement Tool just because it's simple. A custom CVM image can be created that uses eight vCPUs (or four) and then the Cisco UC images can be selected from existing templates.
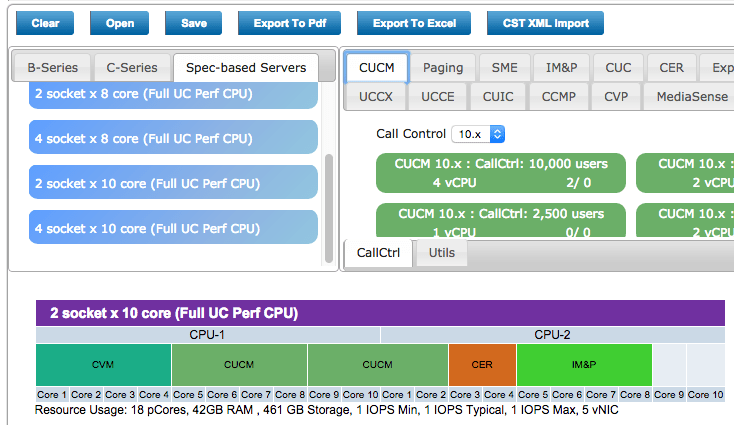
This tool is extremely helpful because the sizes of the various Cisco UC components are embedded in the various templates as shown above. The IOPS calculation of this tool isn't really there yet in the templates. It's an exercise to the reader (or user) to fill out the expected IOPS of each virtual machine. This info can be cobbled together from the various Cisco wiki pages or from information gathered via the Nutanix Prism page.
Nutanix also makes a sizing tool that can be used to size a Nutanix cluster once the specs of the virtual workload are known. Check out this nu.school video to get an idea of how the Nutanix Sizer works:
[embed]https://www.youtube.com/watch?v=Vyy2n45wE2I[/embed]
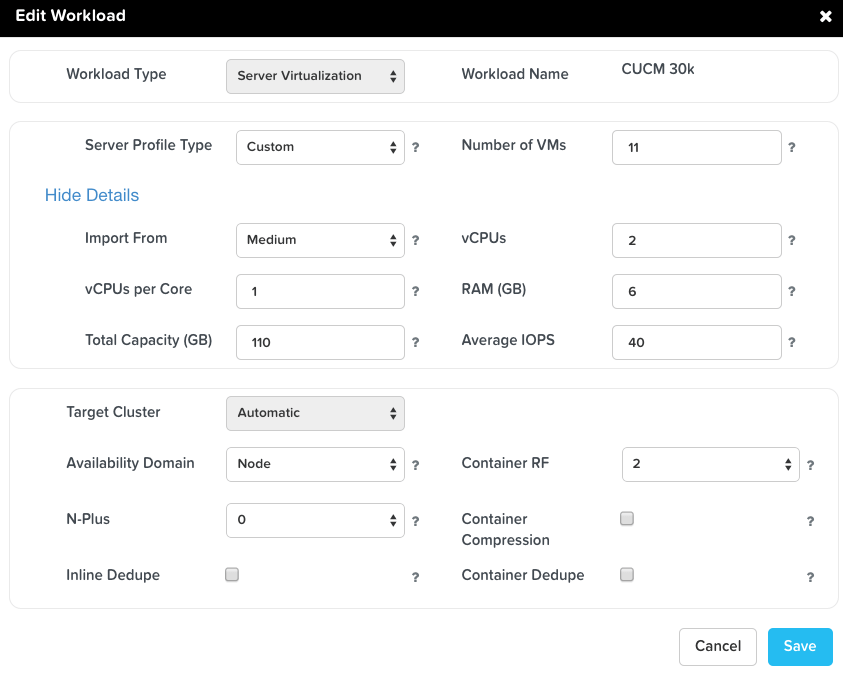
When sizing UC servers, we'll use the "Server Virtualization" workload type. This means for each VM type (CUCM, CUC, CER) we'll specify the number of vCPUs, amount of RAM, size of disk, and expected IOPS. Once this information is entered a Nutanix system (along with a number of nodes) will be chosen. This can be checked against sizing calculations above to ensure the right size system is selected. Here we size 11 CUCM virtual machines. Each VM has 2vCPUs, 6GB RAM, 110GB storage, and an average IOPS of 40 (taken from the Cisco DocWiki).
Cisco UC is a unique case because the 1000 series Nutanix processors do not currently meet the hardware processor requirements that Cisco specifies. This means the 1000 series nodes aren't appropriate for Cisco UC, but all other node types are. We're going to maximize for CPU cores because of Cisco's 1:1 core:vCPU mapping. With most Cisco UC virtual machines we won't run into any storage size or storage performance limitations on the Nutanix system. The primary driver of sizing will be number of free cores!
Maximizing for available storage space or other factors due to other workloads (like MS SQL or Exchange for instance) may lead to selection of a different node type. Nodes in a cluster can be many different types and can be mixed together in the same cluster. A cluster will often contain several storage heavy nodes for VMs with large storage requirements.
Summary and Next Steps
We've covered an overview of Cisco UC and Nutanix, and how to size individual UC VMs and place them on a Nutanix system. With this information it's possible to design a complete Cisco UC solution powered by the Nutanix platform.
Assets from both Cisco and Nutanix can be leveraged to build a completely supported UC solution that takes up less rack space, power, and cooling. It'll be simpler to setup because there are fewer components. It'll be simpler to manage for the same reason AND because of the slick web front end to the combined compute and storage components. It'll be more secure because federal STIG requirements are built into the product in easy to manage config settings (running a security script). One click upgrades for the entire compute and storage infrastructure means admins will be spending more time on the slopes or drinking beer and less on weekend change windows. That's something I can get behind!
To learn more about Nutanix I recommend reading through the Nutanix Bible by Steve Poitras. It's a wealth of great information on how the technology under the hood works. The nu.shool YouTube channel also has some excellent white board videos that I highly recommend.
Feel free to reach out to me on Twitter @bbbburns for follow up, or comment here on the blog.