Nutanix and UC – Part 3: Cisco UC on Nutanix

In the previous posts we covered an Introduction to Cisco UC and Nutanix as well as Cisco's requirements for UC virtualization. To quickly summarize... Nutanix is a virtualization platform that provides compute and storage in a way that is fault tolerant and scalable. Cisco UC provides a VMware centric virtualized VoIP collaboration suite that allows clients on many devices to communicate. Cisco has many requirements before their UC suite can be deployed in a virtual environment and the Nutanix platform is a great way to satisfy these requirements.
In this post I'm going to cover the actual sizing and implementation details needed to design and deploy a real world Cisco UC system. This should help tie all the previous information together.
Cisco UC VM Sizing
Cisco UC VMs are deployed in a two part process. The first part is a downloaded OVA template and the second part is an installation ISO. The OVA determines the properties of the VM such as number of vCPUs, amount of RAM, and number and size of disks and creates an empty VM. The installation ISO then copies the relevant UC software into the newly created blank VM.
There are two ways to size Cisco UC VMs:
- Wing it from experience
- Use the Cisco Collaboration Sizing Tool
I really like "Option 1 - Wing it from experience" since the sizing calculator is pretty complicated and typically provides output that I could have predicted based on experience. "Option 2 - Collaboration Sizing Tool" is a requirement whenever you're worried about load and need to be sure a design can meet customer requirements. Unfortunately the Sizing Tool can only be used by registered Cisco partners so for this blog post we're just going to treat it as a black box.
Determine the following in your environment:
- Number of Phones
- Number of Lines Per Phone
- Number of Busy Hour calls per line
- Number of VM boxes
- Number of Jabber IM clients
- Number of Voice Gateways (SIP, MGCP, or H.323)
- Redundancy Strategy (where is your failover, what does it look like?)
Put this information into the Collaboration Sizing Tool and BEHOLD the magic.
Let's take an example where we have 1,000 users and we want 1:1 call processing redundancy. This means we need capacity for 1,000 phones on one CUCM call processor, and 1,000 phones on the failover system. We would also assume each user has 1 voicemail box, and one Jabber client.
This increases our total to 2,000 devices (1 phone and 1 Jabber per user) and 1,000 voicemail boxes.
Let's assume that experience, the Cisco Sizing Tool, or our highly paid and trusted consultant tells us we need a certain number of VMs of a certain size to deploy this environment. The details are all Cisco UC specific and not really Nutanix specific so I'll gloss over how we get to them.
We need a table with "just the facts" about our new VM environment:
[table]
Product,VM Count,vCPUs,RAM, HDD, OVA
CUCM,2,1,4GB,80GB,2500 user
IM&P,2,1,2GB,80GB,1000 user
CUC,2,2,4GB,160GB,1000 user
CER,2,1,4GB,80GB,20000 user
PLM,1,1,4GB,50GB,NA
[/table]
The first column tells us the Cisco UC application. The second column tells us how many VMs of that application are needed. The rest of the columns are the details for each individual instance of a VM.
The DocWiki page referenced in the last article has details of all OVAs for all UC products. In the above example we are using a 2,500 user CUCM OVA. If you wanted to do a 10,000 user OVA file for each CUCM VM the stats can easily be found:
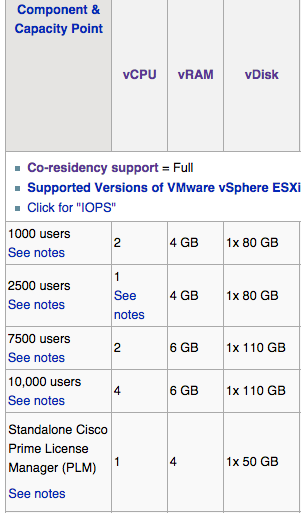
Visit the DocWiki link above for all stats on all products.
Reserving Space for Nutanix CVM
The Nutanix CVM runs on every hypervisor host in the cluster so it can present a virtual storage layer directly to the hypervisor using local and remote disks. By default it will use the following resources:
- 8 vCPU (only 4 reserved)
- Number of vCPUs actually used depends on system load
- 16GB RAM
- Increases if compression or deduplication are in use
- Disk
- This is a bit harder to quantify. The Nutanix Bible has a great writeup on how to determine how much disk space will be used by the CVM and NDFS clustering components.
In a node where we have 16 cores available this means we'd have 12 cores (16 - reserved 4) for all guest VMs such as Cisco UC. A cautious reading of Cisco's requirements though would instruct us to be more careful with the math.
The Cisco docwiki page says "No CPU oversubscription for UC VMs" which means in theory we could be in an oversubscribed state if we provision the following in a 16 core node:
CVM x 4 vCPUs, UC VMs x 12 vCPUS = 16 total
It's safer to provision:
CVM x 8 vCPUs, UC VMs x 8 vCPUs = 16 total
Even though it's unlikely the CVM will ever use all 8 vCPUs.
Placing Cisco UC VMs
That's a lot of text. Let's look at a picture of how that placement works on a single node.
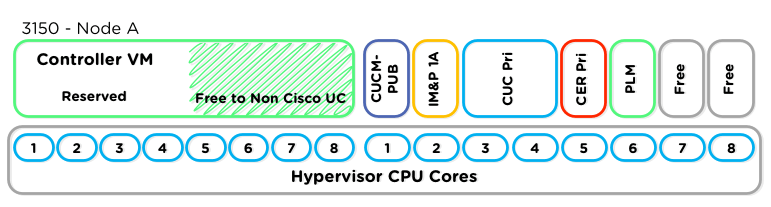
I've taken a single Nutanix node and reserved vCPU slots (on paper) for the VMs I want to run. Repeat this process for additional Nutanix nodes until all of your UC VMs have a place to live. Depending on the Nutanix system used you may have a different number of cores available. Consult the Nutanix hardware page for details about all of the available platforms. As new processors are released this page is sure to be updated.
*EDIT on 2015-10-23* Nutanix switched to a "Configure To Order" model and now many more processor core options are available, from 2x8 core all the way up to 2x18 core. This provides a lot of flexibility for sizing UC solutions.
The shaded section of the provisioned, but not reserved, CVM vCPU allocation is critical to sizing and VM placement. 4 vCPUs that will go unused unless the system is running at peak load. UC VMs are typically not IOPS intensive, so I would recommend running some other Non-Cisco workload in this free space. This allows you to get full efficiency from the Nutanix node while also following Cisco guidance.
Follow best practices on spreading important functions to multiple separate nodes in the cluster. This applies to ALL virtualization of UC. If we have one piece of hardware running our primary server for 1,000 users, it's probably a good idea that the backup unit run on a DIFFERENT piece of hardware. In this case, another Nutanix node would be how we accomplished that.
Remember that at least 3 Nutanix nodes must be used to form a cluster. In the diagram above I've shown just a single node, but we'll have at least two more nodes to place any other VMs we like following all the same rules. In a large Nutanix environment a cluster could contain MANY more nodes.
Installation Considerations
After the UC VM OVAs are deployed the next step is to actually perform the application installation. Without installation the VM is just an empty shell waiting for data to be written to the disk.
I'll use an example CUCM install because it's a good proxy for other UC applications.

The first Nutanix node has two CUCM servers and the second Nutanix node also has two CUCM servers. The installation ISO has to be read somehow by the virtual machine as it's booted. In VMware we have a number of options available.
- Read from a drive on the machine where vSphere Client is running
- Read from a drive inserted into the ESXi Host
- Read from an ISO located on a Datastore

When we select Datastore we can leverage a speedup feature of the Nutanix NDFS. If we put the CUCM ISO in the same NDFS container where the VM disk resides we can use Shadow Clones to make sure that the ISO is only ever read over the network once per Nutanix node.
In our previous example with two CUCM servers, the first CUCM server on the second node would be installed from Datastore. When the second CUCM installation was started on that same second node, it would read the ISO file from the local NDFS shadow clone copy.
Rinse and Repeat
For all of the UC VMs and all Nutanix nodes the same process would be followed:
- Figure out how many and what size UC VMs are needed.
- Plan the placement of UC VMs on Nutanix nodes by counting cores and staggering important machines.
- Deploy the OVA templates according to your plan.
- Install the VMs from ISO making sure to use the Datastore option in vSphere.
In our next blog post we'll look at tools that can be used to make VM placement a bit easier and size Nutanix for different workloads.
Thanks for following along! Your comments are always welcome.