Nutanix recently released the AHV hypervisor, which means I get a new piece of technology to learn! Before I started this blog post I had no idea how Open vSwitch worked or what KVM and QEMU were all about.
Since I come from a networking background originally, I drilled down into the Open vSwitch and KVM portion of the Nutanix solution. Here’s what I learned! Remember my disclaimer – I didn’t know anything about this before I started the blog. If I’ve got something a bit wrong feel free to comment and I’m happy to update or correct.
KVM Host Configuration
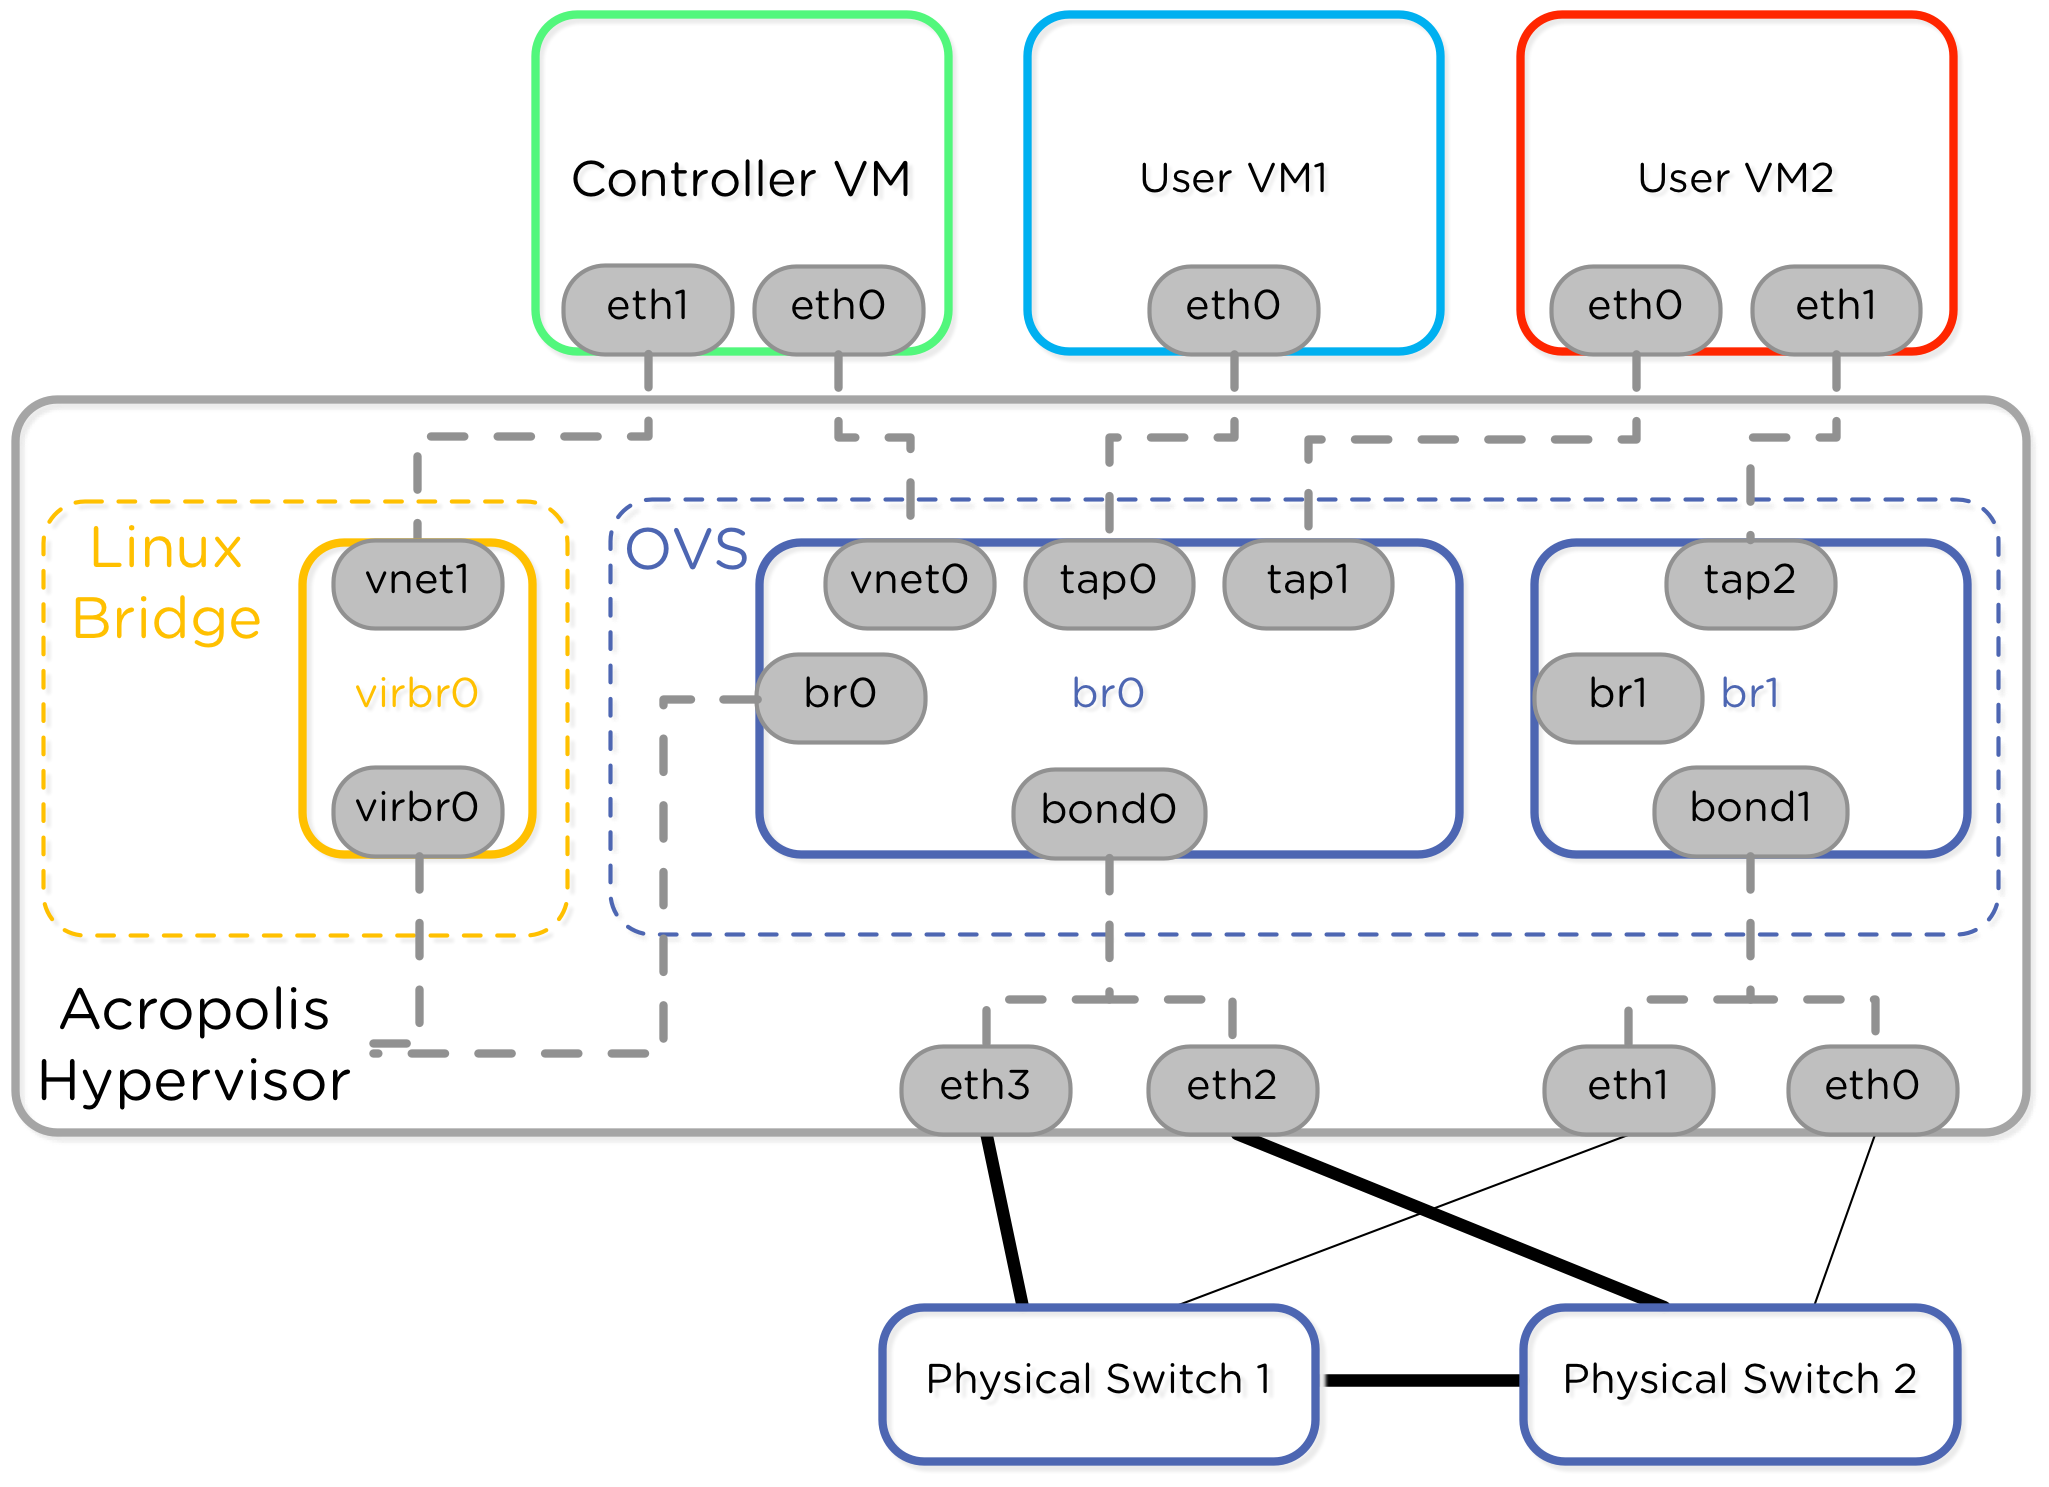
AHV is built on the Linux KVM hypervisor so I figured that’s a great place to start. I read the Nutanix Bible and saw this diagram on networking.
The CVM has two interfaces connecting to the hypervisor. One interface plugs into the Open vSwitch and the other goes to “internal”. I wasn’t sure what that meant. Looking through the hypervisor host config though I saw the following interfaces:
[root@DRM-3060-G4-1-1 ~]# ifconfig
br0 Link encap:Ethernet HWaddr 0C:C4:7A:58:91:50
  inet addr:10.59.31.77 Bcast:10.59.31.255 Mask:255.255.254.0
eth0 Link encap:Ethernet HWaddr 0C:C4:7A:3B:1C:8C
eth1 Link encap:Ethernet HWaddr 0C:C4:7A:3B:1C:8D
eth2 Link encap:Ethernet HWaddr 0C:C4:7A:58:91:50
eth2.32 Link encap:Ethernet HWaddr 0C:C4:7A:58:91:50
eth3 Link encap:Ethernet HWaddr 0C:C4:7A:58:91:51
eth3.32 Link encap:Ethernet HWaddr 0C:C4:7A:58:91:51
lo Link encap:Local Loopback
virbr0 Link encap:Ethernet HWaddr 52:54:00:74:F9:B0
  inet addr:192.168.5.1 Bcast:192.168.5.255 Mask:255.255.255.0
vnet0 Link encap:Ethernet HWaddr FE:54:00:9C:D8:CD
vnet1 Link encap:Ethernet HWaddr FE:54:00:BE:99:B3
The next place I went was routing with netstat -r to see which interfaces were used for each next hop destination.
[root@DRM-3060-G4-1-1 ~]# netstat -r
Kernel IP routing table
Destination  Gateway Genmask       Flags MSS Window irtt Iface
192.168.5.0  *       255.255.255.0 U     0 0 0           virbr0
10.59.30.0   *       255.255.254.0 U     0 0 0           br0
link-local   *       255.255.0.0   U     0 0 0           eth0
link-local   *       255.255.0.0   U     0 0 0           eth1
link-local   *       255.255.0.0   U     0 0 0           eth2
link-local   *       255.255.0.0   U     0 0 0           eth3
link-local   *       255.255.0.0   U     0 0 0           br0
default      10.59.30.1 0.0.0.0    UG    0 0 0           br0
I omitted a lot of text just to be concise here. We can see there are two interfaces with IPs, br0 and virbr0. Let’s start with virbr0, which is that internal interface. You can tell because it’s the 192.168 private IP used for CVM to hypervisor communication. I found that it was a local linux bridge, not an Open vSwitch controlled device:
[root@DRM-3060-G4-1-1 ~]# brctl show virbr0
bridge name bridge id         STP enabled interfaces
virbr0      8000.52540074f9b0 no          virbr0-nic
                                          vnet1
This bridge virbr0 has the vnet1 interface headed up to the internal adapter of the CVM – so THIS is where the CVM internal interface terminates.
That’s one side of the story – the next part is Open vSwitch
[root@DRM-3060-G4-1-1 ~]# ovs-vsctl show
be65c814-5d7c-46ab-bfb1-7b2bea19d954
 Bridge "br0"
  Port "tap345"
    tag: 32
    Interface "tap345"
  Port "vnet0"
    Interface "vnet0"
  Port "br0"
    Interface "br0"
      type: internal
  Port "bond0"
    Interface "eth2"
    Interface "eth3"
  Port "br0-dhcp"
    Interface "br0-dhcp"
      type: vxlan
      options: {key="1", remote_ip="10.59.30.82"}
  Port "br0-arp"
    Interface "br0-arp"
      type: vxlan
      options: {key="1", remote_ip="192.168.5.2"}
ovs_version: "2.1.3"
OvS has a vSwitch called br0. The CVM vnet0 is a port on this bridge, and so is bond0 (the combination of the 10GbE interfaces). We also see this special “type:internal” interface – this one with the IP address assigned to it. This is the external facing IP of the AHV / KVM hypervisor host.
[root@DRM-3060-G4-1-1 network-scripts]# cat ifcfg-br0
DEVICE=br0
DEVICE_TYPE=ovs
TYPE=OVSIntPort
NM_CONTROLLED=no
ONBOOT=yes
BOOTPROTO=none
IPADDR=10.59.31.77
NETMASK=255.255.254.0
GATEWAY=10.59.30.1
OVSREQUIRES="eth3 eth2 eth1 eth0"
In addition to the CVM, external, and internal interfaces we see a tap345 interface tagged in VLAN 32. This matches the tagged interfaces from our “ifconfig -a” command above: eth2.32 and eth3.32. It’ll be used for a VM that has a network interface in VLAN 32.
Finally – we come to the IP Address Management (IPAM) interfaces, br0-arp, and br-dhcp. Steve mentions VXLAN and here’s where we see those concepts. The OvS can either intercept and respond to DHCP traffic, or just let it through. If we allow OvS to intercept the traffic this means Acropolis and Prism now become the point of control for giving out IP addresses to VMs that boot up. Very cool!
Now let’s take a look at the config parameters passed to the running CVM. Right now this box has ONLY the CVM running on it so only one instance of qemu-kvm running.
[root@DRM-3060-G4-1-1 ~]# ps -ef | grep qemu
qemu 9250 1 61 Jun26 ? 1-21:13:21 /usr/libexec/qemu-kvm -name NTNX-DRM-3060-G4-1-1-CVM
-S -enable-fips -machine pc-i440fx-rhel7.0.0,accel=kvm,usb=off,mem-merge=off -cpu host,+kvm_pv_eoi -m 24576 -realtime mlock=on -smp 8,sockets=8,cores=1,threads=1
-uuid 1323cbbc-a20d-d66a-563e-ca7a8609cb73 -no-user-config -nodefaults
-chardev socket,id=charmonitor,path=/var/lib/libvirt/qemu/NTNX-DRM-3060-G4-1-1-CVM.monitor,server,nowait
-mon chardev=charmonitor,id=monitor,mode=control
-rtc base=utc -no-shutdown -boot menu=off,strict=on
-kernel /var/lib/libvirt/NTNX-CVM/bzImage -initrd /var/lib/libvirt/NTNX-CVM/initrd
-append init=/svmboot quiet console=ttyS0,115200n8
-device piix3-usb-uhci,id=usb,bus=pci.0,addr=0x1.0x2
-netdev tap,fd=20,id=hostnet0,vhost=on,vhostfd=21
-device virtio-net-pci,netdev=hostnet0,id=net0,mac=52:54:00:9c:d8:cd,bus=pci.0,addr=0x3
-netdev tap,fd=22,id=hostnet1,vhost=on,vhostfd=23
-device virtio-net-pci,netdev=hostnet1,id=net1,mac=52:54:00:be:99:b3,bus=pci.0,addr=0x4
-chardev file,id=charserial0,path=/tmp/NTNX.serial.out.0
-device isa-serial,chardev=charserial0,id=serial0
-vnc 127.0.0.1:0 -vga cirrus
-device pci-assign,configfd=24,host=01:00.0,id=hostdev0,bus=pci.0,addr=0x5,rombar=0
-device virtio-balloon-pci,id=balloon0,bus=pci.0,addr=0x7 -msg timestamp=on
Maybe a better way to look at the CVM details is via the XML configuration:
[root@DRM-3060-G4-1-1 ~]# cat /etc/libvirt/qemu/NTNX-DRM-3060-G4-1-1-CVM.xml
<domain type='kvm'>
 <name>NTNX-DRM-3060-G4-1-1-CVM</name>
 <uuid>1323cbbc-a20d-d66a-563e-ca7a8609cb73</uuid>
 <memory unit='KiB'>25165824</memory>
 <currentMemory unit='KiB'>25165824</currentMemory>
 <memoryBacking>
 <nosharepages/>
 <locked/>
 </memoryBacking>
 <vcpu placement='static'>8</vcpu>
 <os>
 <type arch='x86_64' machine='pc-i440fx-rhel7.0.0'>hvm</type>
 <kernel>/var/lib/libvirt/NTNX-CVM/bzImage</kernel>
 <initrd>/var/lib/libvirt/NTNX-CVM/initrd</initrd>
 <cmdline>init=/svmboot quiet console=ttyS0,115200n8</cmdline>
 <boot dev='hd'/>
 <bootmenu enable='no'/>
 </os>
 <features>
 <acpi/>
 <apic eoi='on'/>
 <pae/>
 </features>
 <cpu mode='host-passthrough'>
 </cpu>
 <clock offset='utc'/>
 <on_poweroff>destroy</on_poweroff>
 <on_reboot>restart</on_reboot>
 <on_crash>restart</on_crash>
 <devices>
 <emulator>/usr/libexec/qemu-kvm</emulator>
 <controller type='usb' index='0'>
 <address type='pci' domain='0x0000' bus='0x00' slot='0x01' function='0x2'/>
 </controller>
 <controller type='ide' index='0'>
 <address type='pci' domain='0x0000' bus='0x00' slot='0x01' function='0x1'/>
 </controller>
 <controller type='pci' index='0' model='pci-root'/>

##Here is the CVM interface being linked to the br0 OvS interface
 <interface type='bridge'>
 <mac address='52:54:00:9c:d8:cd'/>
 <source bridge='br0'/>
 <virtualport type='openvswitch'>
 <parameters interfaceid='7a0a4887-b8cd-4f02-960d-cca5c1ca73cc'/>
 </virtualport>
 <model type='virtio'/>
 <address type='pci' domain='0x0000' bus='0x00' slot='0x03' function='0x0'/>
 </interface>

##Here is the CVM interface going to the local link bridge.
 <interface type='network'>
 <mac address='52:54:00:be:99:b3'/>
 <source network='NTNX-Local-Network'/>
 <model type='virtio'/>
 <address type='pci' domain='0x0000' bus='0x00' slot='0x04' function='0x0'/>
 </interface>

 <serial type='file'>
 <source path='/tmp/NTNX.serial.out.0'/>
 <target port='0'/>
 </serial>
 <console type='file'>
 <source path='/tmp/NTNX.serial.out.0'/>
 <target type='serial' port='0'/>
 </console>
 <input type='mouse' bus='ps2'/>
 <input type='keyboard' bus='ps2'/>
 <graphics type='vnc' port='-1' autoport='yes' listen='127.0.0.1'>
 <listen type='address' address='127.0.0.1'/>
 </graphics>
 <video>
 <model type='cirrus' vram='16384' heads='1'/>
 <address type='pci' domain='0x0000' bus='0x00' slot='0x02' function='0x0'/>
 </video>
 <hostdev mode='subsystem' type='pci' managed='yes'>
 <source>
 <address domain='0x0000' bus='0x01' slot='0x00' function='0x0'/>
 </source>
 <rom bar='off'/>
 <address type='pci' domain='0x0000' bus='0x00' slot='0x05' function='0x0'/>
 </hostdev>
 <memballoon model='virtio'>
 <address type='pci' domain='0x0000' bus='0x00' slot='0x07' function='0x0'/>
 </memballoon>
 </devices>
</domain>
We saw a new reference in that last command, NTNX-Local-Network. If we look at virsh for information about defined networks we see the following:
[root@DRM-3060-G4-1-1 ~]# virsh net-list --all
 Name               State  Autostart Persistent
----------------------------------------------------------
 NTNX-Local-Network active yes       yes
 VM-Network         active yes       yes
If we look in the /root/ partition there are definitions for these:
[root@DRM-3060-G4-1-1 ~]# cat net-NTNX-Local-Network.xml
<network connections='1'>
 <name>NTNX-Local-Network</name>
 <bridge name='virbr0' stp='off' delay='0' />
 <ip address='192.168.5.1' netmask='255.255.255.0'>
 </ip>
</network>

[root@DRM-3060-G4-1-1 ~]# cat net-VM-Network.xml
<network connections='1'>
 <name>VM-Network</name>
 <forward mode='bridge'/>
 <bridge name='br0' />
 <virtualport type='openvswitch'/>
 <portgroup name='VM-Network' default='yes'>
 </portgroup>
</network>
These two pieces of information tie everything together neatly for us. The internal network given to the CVM is the linux virbr0 device. The external network given to the CVM is OvS br0.
Now I think I finally understand that image presented at the beginning!
CVM Guest Configuration
Since we understand the KVM/AHV host configuration lets take a look in the CVM guest. This should be a little easier.
nutanix@NTNX-15SM60140129-A-CVM:10.59.30.77:~$ netstat -r
Kernel IP routing table
Destination Gateway Genmask         Flags MSS Window irtt Iface
192.168.5.0 *       255.255.255.128 U     0 0 0           eth1
192.168.5.0 *       255.255.255.0   U     0 0 0           eth1
10.59.30.0  *       255.255.254.0   U     0 0 0           eth0
link-local  *       255.255.0.0     U     0 0 0           eth0
link-local  *       255.255.0.0     U     0 0 0           eth1
default     10.59.30.1 0.0.0.0      UG    0 0 0           eth0
The routing table shows the internal and external networks, and just two network adapters. The eth1 adapter has a subinterface. This one is eth1:1 as opposed to .1. Not entirely sure what that one means – but I’ll keep it in mind in case I come across something later on.
nutanix@NTNX-15SM60140129-A-CVM:10.59.30.77:~$ ifconfig -a
eth0 Link encap:Ethernet HWaddr 52:54:00:9C:D8:CD
  inet addr:10.59.30.77 Bcast:10.59.31.255 Mask:255.255.254.0

eth1 Link encap:Ethernet HWaddr 52:54:00:BE:99:B3
  inet addr:192.168.5.2 Bcast:192.168.5.127 Mask:255.255.255.128

eth1:1 Link encap:Ethernet HWaddr 52:54:00:BE:99:B3
  inet addr:192.168.5.254 Bcast:192.168.5.255 Mask:255.255.255.0
  UP BROADCAST RUNNING MULTICAST MTU:1500 Metric:1

lo Link encap:Local Loopback
  inet addr:127.0.0.1 Mask:255.0.0.0
That’s it – just two simple interfaces in the CVM. One for internal traffic to the hypervisor directly, another for receiving any external requests from remote CVMs, the management APIs, and all of the other magic that the CVM performs!
This concludes our walk through of networking inside a Nutanix AHV host. I hope you learned as much as I did going through these items! Please comment or reach out to me directly if you have any questions.